Day: February 25, 2025

The Ultimate Guide to Sound Absorbing Panels: Answering Your Top QuestionsThe Ultimate Guide to Sound Absorbing Panels: Answering Your Top Questions

The Ultimate Guide to Sound Absorbing Panels: Answering Your Top Questions

Sound plays a crucial role in our daily lives, whether at home, work, or public spaces. Excessive noise, however, can lead to distractions, reduced productivity, and poor acoustic quality. This is where sound-absorbing panels come into play. Designed to enhance sound clarity by reducing echoes and reverberation, these panels are essential for creating comfortable environments.

In this comprehensive guide, we’ll answer the most frequently asked questions about sound-absorbing panels, helping you make informed decisions about their installation and benefits. Large open spaces, like restaurants and auditoriums, benefit greatly from

echo control

for better acoustic balance.

What Are Sound Absorbing Panels and How Do They Work?

Sound-absorbing panels are specially engineered materials designed to minimize unwanted noise by absorbing sound waves instead of reflecting them. Unlike soundproofing, which blocks sound from entering or leaving a space, sound absorption focuses on reducing internal noise levels.

Key Features of Sound Absorbing Panels:

  • Made from materials like foam, fabric, fiberglass, and PET felt.
  • Installed on walls, ceilings, or as freestanding dividers.
  • Measured using a Noise Reduction Coefficient (NRC) rating, where higher values indicate better absorption.

Types of Sound Absorbing Panels and Their Benefits

There are various types of sound-absorbing panels, each serving a unique purpose based on the environment and desired acoustic effects. Whether for professional or personal use,

panel installation

helps in achieving superior sound quality.

Common Types:

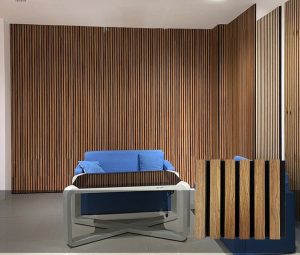
  • Wall-Mounted Panels: Installed on walls to absorb mid and high-frequency sound waves.
  • Ceiling Baffles and Clouds: Suspended from ceilings to tackle noise in large, open areas.
  • Freestanding Panels: Movable and ideal for dynamic spaces requiring flexible acoustic solutions.
  • Fabric-Wrapped Panels: Offer aesthetic appeal while improving sound absorption.
  • Bass Traps: Designed to absorb low-frequency sounds, perfect for recording studios.

Where and How Should Sound Absorbing Panels Be Installed?

Proper placement of sound-absorbing panels is crucial for maximizing their effectiveness. Here’s a guide to strategic installation:

Ideal Locations:

  • Office Spaces: Reduce distractions and enhance communication.
  • Home Theaters: Improve audio clarity and reduce sound distortion.
  • Recording Studios: Optimize sound recording by minimizing echo.
  • Restaurants & Cafes: Create a pleasant dining experience by managing background noise.

Installation Tips:

  • Identify first reflection points to minimize echo.
  • Cover 20-30% of room surfaces for effective noise reduction.
  • Place panels symmetrically for balanced acoustics.
  • Use ceiling-mounted panels in large open spaces to prevent excessive sound buildup.

How Many Sound Absorbing Panels Do You Need?

The number of panels required depends on room size, purpose, and existing acoustic conditions. Proper placement of

room acoustics

ensures maximum efficiency in absorbing unwanted noise.

Room Size Recommended Number of Panels
Small (up to 150 sq. ft.) 10-20 panels
Medium (150-300 sq. ft.) 20-30 panels
Large (300+ sq. ft.) 30-60 panels

It’s always best to start with a moderate number and adjust based on the room’s acoustic response.

What Are the Benefits of Installing Sound Absorbing Panels?

Investing in sound absorbing panels comes with several advantages:

  • Improved Speech Clarity: Ideal for offices, classrooms, and conference rooms.
  • Enhanced Privacy: Reduces sound travel, making confidential conversations more secure.
  • Better Productivity: Minimized distractions lead to increased focus in workplaces.
  • Aesthetic Appeal: Available in various colors and styles to match any decor.
  • Eco-Friendly Options: Many panels are made from recycled materials, promoting sustainability.

How to Choose the Right Sound Absorbing Panels

Selecting the right panels requires considering multiple factors:

Things to Consider:

  • Room Purpose: Determine if the primary goal is noise reduction or sound quality enhancement.
  • Material Choice: Options include PET felt (eco-friendly), fiberglass (high performance), and foam (cost-effective).
  • Aesthetic Design: Panels come in different textures, shapes, and colors to suit the decor.
  • Budget: Compare costs while ensuring high-quality absorption efficiency.

Frequently Asked Questions (FAQs)

Are Sound Absorbing Panels the Same as Soundproofing Panels?

No. Soundproofing panels prevent sound from passing through walls while sound-absorbing panels control internal acoustics by reducing echo and reverberation.

Can Sound Absorbing Panels Be Used in Homes?

Yes! They are perfect for home theaters, music rooms, and open living spaces where controlling noise levels enhances comfort.

Do Sound Absorbing Panels Work in Open Spaces?

Absolutely! Ceiling baffles and freestanding panels help manage sound in large areas like restaurants, offices, and auditoriums.

How Do I Maintain Sound Absorbing Panels?

Most panels require minimal maintenance. Regular dusting or vacuuming keeps them in good condition. Fabric-wrapped panels may need occasional spot cleaning.

Can I Install Sound Absorbing Panels Myself?

Yes! Many panels come with DIY-friendly mounting options like adhesive strips, Z-clips, or hooks for easy installation.

By incorporating sound-absorbing panels into your space, you can create a more pleasant and functional environment. Whether you’re looking to improve productivity in the office, enhance your home theater experience, or reduce unwanted noise in a commercial setting, these panels offer an effective solution. Ready to transform your space? Explore the best sound-absorbing panels today!

When to Replace Your Roof in Los Angeles: A Homeowner’s GuideWhen to Replace Your Roof in Los Angeles: A Homeowner’s Guide

Why Roof Replacement in Los Angeles Matters

Your roof does more than just keep the rain out—it protects your home, keeps energy costs down, and adds to your property’s value. But like everything else, roofs don’t last forever. If you’re a homeowner in Los Angeles, knowing when to replace your roof can save you from unexpected disasters and expensive repairs. To ensure long-term durability, researching

professional roofing contractor

is highly recommended.

Roof Replacement Los Angeles is more than just a fix; it’s an investment in safety and comfort. But how do you know when it’s time?

Signs You Need a New Roof

If you wait too long to replace your roof, minor issues can turn into major problems. Here are the top signs that tell you it’s time for a roof replacement:

1. Your Roof is Over 20 Years Old

Different roofing materials have different lifespans. If your roof is nearing its expiration date, consider replacing it before problems start.

  • Asphalt shingles: 20-30 years
  • Metal roofing: 40-70 years
  • Clay and concrete tiles: 50-100 years
  • Wood shingles: 25-30 years

If your roof is within this age range, get a professional inspection to check for hidden damage.

2. You Notice Water Leaks and Stains

Roof leaks are a serious warning sign. If you see:

  • Water stains on ceilings or walls
  • Dripping water during rain
  • Mold or mildew growing in the attic

These could mean your roof’s protective layer is failing. Ignoring leaks can lead to structural damage and costly interior repairs.

3. Shingles Are Missing, Curling, or Cracked

Check your roof for:

  • Missing shingles: Gaps allow water to seep in.
  • Curled edges: Exposure to sun and moisture weakens shingles.
  • Cracked surfaces: Can’t fully protect against rain and wind.

Los Angeles weather can be tough on roofs. If you notice these issues, a replacement may be the best option.

What to Expect During a Roof Replacement

Replacing your roof isn’t as overwhelming as it sounds. Understanding the process makes it easier.

Step 1: Roof Inspection and Estimate

A professional roofing contractor will assess your current roof, identify problem areas, and provide a cost estimate for materials and labor.

Step 2: Choosing Your Roofing Material

Selecting the right material matters. Consider:

  • Asphalt shingles: Affordable and easy to install
  • Metal roofing: Long-lasting and energy-efficient
  • Clay tiles: Durable and stylish
  • Wood shingles: Eco-friendly but needs maintenance

Roof Replacement Los Angeles should match your home’s style, budget, and weather conditions.

Step 3: Roof Removal and Installation

Your old roof is removed, damaged areas are repaired, and new materials are installed. A reliable contractor will ensure proper sealing and insulation to prevent future leaks.

Step 4: Final Inspection and Cleanup

Once the job is done, your contractor will check for quality and remove all debris, leaving your home spotless.

If you’re considering a new roof, learning about

roof replacement process

can help you make an informed choice.

Choosing the Best Roofing Contractor in Los Angeles

Your roof is a major investment—don’t trust just anyone to replace it. Here’s how to find the best professional for the job:

  1. Check Reviews and Ratings – Look for contractors with strong testimonials and high ratings.
  2. Verify Licenses and Insurance – Make sure they’re legally certified to work in California.
  3. Ask for a Written Estimate – Get a clear breakdown of costs before signing any contract.
  4. Look at Past Work – A reputable company will have a portfolio of completed projects.

Roof Replacement Los Angeles should be handled by experienced professionals who understand local building codes and weather conditions.

Benefits of Roof Replacement in Los Angeles

A new roof isn’t just about fixing problems—it comes with plenty of advantages:

  • Boosts Property Value – A new roof increases curb appeal and resale price.
  • Improves Energy Efficiency – Modern materials help keep your home cooler in summer.
  • Provides Better Protection – Say goodbye to leaks, mold, and heat loss.
  • Reduces Maintenance Costs – Fewer repairs mean long-term savings.

If you’re considering Roof Replacement Los Angeles, these benefits make it a worthwhile investment. Many homeowners overlook the importance of

signs you need a new roof

, which can lead to costly repairs down the line.

Frequently Asked Questions (FAQs)

How long does a roof replacement take?

Most residential roof replacements take one to three days, depending on size and complexity.

Is it better to repair or replace my roof?

If the damage is minor, repairs may work. But if your roof is older than 20 years or has widespread damage, replacement is the better choice.

What’s the best time of year to replace a roof in Los Angeles?

Spring and early fall are ideal, but thanks to Los Angeles’ mild climate, roof replacements can be done year-round.

Will homeowners insurance cover my roof replacement?

It depends. If the damage is from storms or unexpected events, insurance might cover it. But if it’s due to wear and tear, you’ll need to pay out of pocket.

How much does a roof replacement cost in Los Angeles?

The cost varies based on material and size, but expect to pay anywhere from $5,000 to $15,000 or more. Get multiple quotes to compare prices.

Final Thoughts

Your roof protects everything inside your home. Knowing when to replace it can prevent costly repairs and improve your home’s overall value. If you notice leaks, missing shingles, or aging materials, don’t wait—contact a professional for a Roof Replacement Los Angeles today.

Investing in a new roof means peace of mind, energy savings, and long-term protection for your home and family.

Water Damage Restoration: Save Your Home NowWater Damage Restoration: Save Your Home Now

The Hidden Dangers of Water Damage

Water can be a silent destroyer. One moment, everything seems fine, and the next, you’re dealing with soaked carpets, water-stained walls, and a musty smell that won’t go away. Whether it’s a burst pipe, a leaking roof, or a surprise flood, water damage doesn’t just ruin your belongings—it threatens the very structure of your home. It’s important to act fast when dealing with water damage, which is why finding a

certified water damage restoration company

can help minimize the destruction and cost.

Water Damage Restoration is not just about drying things up. It’s about acting fast to prevent mold, decay, and costly repairs. Ignoring water damage can lead to major issues like:

  • Weakened Foundations – Water can seep into walls, weakening your home’s structure.
  • Mold and Mildew – These can spread within 24 hours, affecting indoor air quality.
  • Electrical Hazards – Water and electricity don’t mix, creating fire risks.
  • Ruined Valuables – Furniture, electronics, and sentimental items may be permanently damaged.

This is why fast and effective Water Damage Restoration is the key to saving your home. Let’s break down what you need to do when disaster strikes.

Step-by-Step Guide: What to Do When Water Damage Happens

Water damage can feel overwhelming, but taking the right steps can reduce destruction and cut repair costs. Follow this simple process to protect your home and belongings.

1. Stop the Water Source Immediately

  • Shut off the main water valve if the damage is due to a burst pipe.
  • If it’s a roof leak, use buckets or tarps to minimize damage.
  • In case of natural flooding, wait until it’s safe to enter your home.

2. Ensure Your Safety

  • Avoid contact with standing water—it could be contaminated.
  • Turn off electricity if water is near outlets or appliances.
  • Wear protective gear like gloves and waterproof boots when entering flooded areas.

3. Call a Professional Water Damage Restoration Team

Water damage can worsen within hours. Professionals have specialized tools to remove moisture, prevent mold, and restore your home properly. The sooner you call, the better.

4. Remove Excess Water

  • Use mops, towels, or wet vacuums to soak up as much water as possible.
  • Open windows and doors for better airflow.
  • Use fans and dehumidifiers to speed up drying.

5. Save What You Can

  • Move valuable items to a dry area.
  • Remove rugs, curtains, and upholstery to prevent mold growth.
  • If any documents or photos are wet, freeze them to prevent deterioration.

6. Document the Damage for Insurance Claims

  • Take clear photos and videos of affected areas.
  • Make a list of damaged items with estimated values.
  • Contact your insurance provider to report the damage as soon as possible.

If you’re facing unexpected flooding, understanding the

steps to take after a flood

process can save you time, money, and stress.

Why You Should Never Delay Water Damage Restoration

Delaying Water Damage Restoration can cost you thousands of dollars in the long run. Here’s what happens when water sits for too long:

  • Within 24 Hours – Mold starts growing, wood swells, and drywall weakens.
  • Within a Week – Structural damage worsens, and the air becomes filled with harmful bacteria.
  • After a Month – The home’s foundation can deteriorate, leading to expensive reconstruction.

By acting quickly, you can prevent a minor leak from turning into a major disaster. To protect your home from future disasters, knowing how to handle

how to dry out a flooded home

is essential for every homeowner.

How to Choose the Right Water Damage Restoration Service

Not all restoration companies are the same. Choosing the right team can make a huge difference in how well your home is restored. Look for a company that offers:

  • 24/7 Emergency Services – Water damage doesn’t wait, and neither should your restoration team.
  • Certified Technicians – Make sure they have IICRC (Institute of Inspection, Cleaning and Restoration Certification).
  • Fast Response Time – The longer you wait, the worse the damage gets.
  • Comprehensive Services – A good company handles everything from water extraction to repairs.
  • Good Reviews and Reputation – Check customer testimonials before making a decision.

Water Damage Prevention Tips

While you can’t control nature, you can take steps to prevent water damage inside your home.

Regular Maintenance Checklist

  • Inspect pipes for leaks at least once a year.
  • Keep gutters clean to prevent roof damage.
  • Install a sump pump in basements prone to flooding.
  • Seal windows and doors properly to keep out moisture.
  • Monitor water bills for unexpected spikes, which could indicate hidden leaks.

By following these tips, you can reduce the risk of needing Water Damage Restoration in the future.

FAQs About Water Damage Restoration

1. How long does Water Damage Restoration take?

It depends on the severity of the damage. Minor issues can be fixed in a few days, while major flooding may take weeks.

2. Can I handle water damage cleanup myself?

Small spills are manageable, but serious water damage needs professional attention to prevent mold and structural issues.

3. Will insurance cover Water Damage Restoration?

Many policies cover sudden water damage (like a burst pipe), but not gradual leaks. Always check your policy for details.

4. How do professionals remove water from my home?

They use industrial-grade pumps, dehumidifiers, and air movers to dry out the area quickly and prevent further damage.

5. What are the signs of hidden water damage?

Look for water stains, peeling paint, musty odors, warped floors, or unexplained mold growth.

Final Thoughts: Act Fast to Protect Your Home

Water damage is more than an inconvenience—it’s a serious threat to your home’s safety and value. Quick action and professional Water Damage Restoration services can make all the difference.

When disaster strikes, don’t wait. Protect your home, your health, and your peace of mind by calling experts who can restore your space before it’s too late.